Monday, January 31, 2011

Product Review: Kinnikinnick Cookies and Donuts!


If there's one gluten-free food I'm really skeptical of, it's frozen gluten-free donuts. That just sounds like a disappointment.

But disappointed is far from how I felt after taking a bit out of Kinnikinnick's Chocolate Dipped Donuts and their special Cinnamon-Apple Donuts--they were deeelicious!!!

They contacted me a few weeks ago to see if I'd sample their Cinnamon-Apple Donuts. I said yes, because I was already a fan of their gluten-free graham crackers. Plus, if there's one thing I learned in college, it's this: If food is free, eat it (well, most of the time). I'm so glad I accepted their offer! They were even nice enough to send over their chocolate covered donuts, a box of their chocolate creme cookies, and gluten-free panko bread crumbs. The chocolate creme cookies were also a hit--I even shared some with my non-gf eating friends this weekend and they enjoyed them too. I've yet to try the bread crumbs, but I'll certainly be using them in the near future.

The only problem with the donuts and the cookies? They're addicting. I just got a root canal, the last thing I need is more sugary desserts. Seriously, though, each bite convinced me that the $2500 root canal and crown weren't that bad. ;)

I will be buying the donuts again! I can see why they suggest buying the Cinnamon-Apple ones for your sweetie this Valentine's. It's easy to find tasty gluten-free chocolate, but donuts? Good GF donuts are a rarity. Thanks Kinnikinnick for making tasty ones!

Sunday, January 23, 2011

Gluten-free Wonton Soup (or Ravioli :)

Are you all staying warm these days? That seems to be a struggle for us here on the East Coast, as we keep getting hit with one snowstorm after the other. Now I've got a sick little one and a craving for soup. But not just any soup...wonton soup!

Wontons: little magic bundles of porky deliciousness (except, these here are more Texas-sized). Who knew that getting pork filling to taste restaurant-good could be soo easy? But only thanks to a certain tasty recipe that provided the inspiration for this cooking adventure.

I've been craving wonton soup for months now, no--probably more like years (you GF folks know how it is to have an unsatisfied craving for ages!). I finally gave in and decided to experiment. Here are the results of my first experiment...

What I learned:
We're not going to have as much elasticity using gf flour to make wonton wrappers as we would using all purpose flour. Surprise! ;) But why should we let that stop us from experimenting?!

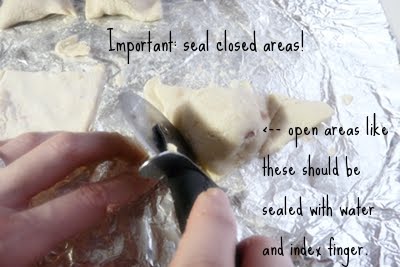
The good thing about this wonton dough recipe is that it's quite forgiving. I tried making the wonton wrappers (or squares) as thin as possible, and ended up with a few holes. Patching them up was fairly easy. Just use an extra bit of dough, if necessary. Keep a glass of water on the side to dip your index fingers in, so that you can use the water to "glue" the patch on. Smooth out the surface with more water. There were a few that didn't tear because I made 'em thick, but they ended up being thicker than I would've liked.

This dough is also pretty sturdy, because the wontons didn't fall apart after getting into some hot water (or chicken broth) with a few chopped green onions :). This particular recipe makes enough for 12 whole wontons, but the wonton filling (meatball) recipe makes enough for about 24.

When experimenting, I like to start off with small batches. You can just double the dough recipe if you like, or throw in a few meatballs without wrappers. They also won't dissolve in the soup :).

I think this recipe would make tasty homemade ravioli--give it a try and let me know how it works out for you!

I've also been experimenting with croissants! Yes, so far I've made them twice. Stay tuned for a croissant post in the very near future. (As in, not months from now. I promise to keep my resolution ;).

Finally...the recipe and a quick photo tutorial. Because of the elasticity issue, I decided to fold these more like ravioli than traditional wontons. :)

Wonton Wrappers, makes 12 complete:
2 tsp potato flour (not potato starch!)
1 tsp xanthan gum
1/4 cup brown rice flour
1/2 cup white rice flour
1/4 cup sweet sorghum flour
1 large egg
1/8 tsp sea salt
1/4 cup and reserved 2 tablespoons cold water

about 1/4 cup more white rice flour reserved, for rolling out wontons

Mixing instructions-create the flour blend first, then add the salt and xanthan gum. Mix well. Add the egg and water (2tbsp last). I divided the dough into smaller portions and covered the portions I wasn't using with a towel. You can either roll out with a rolling pin or use your hands (I found it easier to use my hands--like making tortillas). Then cut out individual squares (about 4 inches) with a pizza cutter; I filled each wonton with about 1.5-2 tsps of meat.

Wonton filling (ground pork):
1/2 pound ground lean pork
1 tsp mirin
1/2 tsp dried onion
1/2 tsp garlic
1 tablespoon soy sauce
1 tsp sugar
1/4 tsp ground ginger
Combine all ingredients, mix well.

Throw the wontons into a pot filled with 32 ounces of lightly boiling chicken broth. Add 1 tsp onion powder, and 1 tsp garlic powder. I also added 2 chopped green onions and a package of my favorite stir fry veggies (not traditional, but hearty :). I added the veggies at the very end, once the wontons were cooked (they should be firm, meatballs shouldn't be pink).


Tuesday, January 18, 2011

Cloudy with a Chance of...Molasses rolls?


Hi there , Folks!

I know, it's been ages! I'm a little nervous typing right now, because I feel like I actually have an audience! Believe me, this is definitely a good thing. I'm pleasantly surprised that you folks have subscribed. I'm not gonna list how many feedburner subscribers I have, because I'm sure some of you blogging pros will laugh at my excitement. Oddly, that's part of the reason why I don't blog as much these days, because I'm being watched :D!

I started this blog typing as if someone was reading, because isn't that how blogging works? At first, you tell yourself that the comments aren't there because imaginary blogging friends only have imaginary fingers, of course! Then, the adrenaline rush hits after the first couple of comments start rolling in; then you post a million times a day…and then?


Well, now you folks are saying things, and actually reading! Oh, the anxiety. I feel like you people are watching me now. I have a bit of stage fright, and I just use my 8 month old as my excuse for not posting ;). What if I forget to type in an ingredient when I input the recipe? What if the photos of my molasses rolls resemble meatballs instead of…molasses rolls. You all will kindly let me know, right? Right?!

In all honesty, I'm very thankful for you all! Thankful from the bottom of my carbohydrate-addicted heart! Thank you for giving me an excuse to bake gluten-free treats, especially now that my husband is on the paleo diet! Seriously, the guy is married to a woman with a blog called "Flour Arrangements" and he vowed to stop eating carbs in 2011! Meanwhile, my resolution is to post more on here! I guess opposites really do attract ;).

Enjoy these molasses rolls; I promise, despite the photos, they don't taste anything like meatballs! Actually, they don't taste much like molasses either, it's a very subtle molasses/spiced taste. Store them in an air-tight container, then warm 'em up in the micro for 15 seconds to enjoy them warm and soft after they've lost their "fresh outta the oven" texture.

Molasses Rolls (Makes 8)

Dry Mixture:
1/2 cup white rice flour
1/2 cup brown rice flour
1/4 cup almond meal
1/4 cup sweet sorghum flour
1/4 cup tapioca starch
1 tsp cinnamon
1/2 tsp nutmeg
1/2 tsp ginger
4 tablespoons low-fat dried milk powder
1 tsp xanthan gum
3/4 tsp sea salt
Yeast Mixture:
1 tablespoon sugar
2 1/4 tsp yeast
1/2 cup warm water (let rise until it just starts to foam on top--about 10 minutes)
Other wet mixture:
2 large eggs
2 tablespoons canola oil
1 1/2 tablespoons molasses

Combine all dry ingredients together, mix well.

In another small bowl, combine the water and sugar, then add yeast. Let it sit for about 8 minutes, or until foam just begins to form on top (proofing starts).

Next, combine the wet ingredients in another small bowl.

Fold the wet ingredients into the dry bowl. Then fold in the yeast mixture.

Let rise in a warm, dark area for about an hour.

Shape dough into individual rolls, about 8. Bake in a pre-greased cake or pie pan.

Preheat oven to 350 and bake rolls for about 22-25 minutes.

Store in air-tight container for up to 3 days (don't require refrigeration).