Showing posts with label Gluten-Free. Show all posts

Saturday, April 7, 2012

Gluten-Free Sugar Cookies

Gluten-Free Sugar Cookies
Makes about 20

1 cup white rice flour
1/4 cup tapioca flour
1/2 cup potato starch
1/4 cup brown rice flour
1/4 cup almond meal
3/4 tsp orange peel, dried
1 tsp coarse sea salt
1 tsp xanthan gum

1 1/4 cup sugar
2 eggs
1 tsp vanilla extract
5 tablespoons softened butter
1 tablespoon orange marmalade
1 tablespoon cold water

Instructions:
1. Start by combining all of the dry ingredients, from the rice four to the xanthan gum. Mix well.

2. Next, cream together all the wet ingredients. Use a mixer, you really want that butter broken down.

3. In 1/2 cup intervals, start adding the dry ingredients to the bowl with the wet ingredients. This is a good time to use the mixer again. It's important to get the butter evenly distributed throughout the flour mixture so you don't get bubbles in your cookies when they bake :). Continue this process until all the ingredients are combined.

4. Divide the dough in half, now freeze it for about 45 minutes. Sounds crazy, but this makes it easy to work with! You want it fairly solid and very cold.

5. Get some foil or parchment paper out, lay out enough to bake half the cookies on. GENEROUSLY dust this work surface with rice flour. I mean, really cover the parchment paper or foil, on the counter, with rice flour. This will prevent sticking and won't make the cookies taste bad--believe me, I did it :).

6. Using only half of the dough (leave the rest in the freezer until you're ready to work with it), shape it into a disc. Now dust the top and bottom with rice flour before placing it on the foil/parchment. Roll out the dough with a flour-dusted rolling pin, not too thin. Now have fun with the cookie cutters! You can leave the cookies on the sheet of foil, don't worry about the flour underneath the cookies--it'll help them to not stick when you try to remove them. Leave about 1/4 of an inch between each cookie, they don't spread much.

7. Preheat your oven to 350 and bake the cookies on the middle rack for about 12-14 minutes.

8. After they cool for about 30 minutes, you can decorate them with royal icing. I used this recipe. I doubled it and added a little less water.

Happy Easter Weekend! Please forgive my absence over these last few months! I have a good excuse. I'll let the photo at the bottom of this post explain everything ;).

Sugar cookies remind me of childhood. So simple, usually, but so yummy and sweet. I wish I could bottle the scent. But making them gluten-free, and photo-worthy, wasn't such a simple task...

Some important things to keep in mind when making these cookies and preparing the dough: The key is working with cold dough! I think that's the case with most buttery cookies, but it is absolutely essential here. Also, don't be afraid to get crazy with the rice flour. When I say sprinkle generously with flour, I actually mean pour the stuff all over your work surface so that these little guys don't stick! Oh yes, and let the cookies cool before you frost them.


The great thing about this particular Royal Icing Recipe is that it's pretty forgiving and doesn't harden as quickly as I expected it to. Not that I know much about royal icing, this is the first time I've actually decorated sugar cookies with it! I made mine a little thicker than Martha's recipe, but that's because I used liquid food coloring; I've heard that you should actually use gels? Anyone have any good frosting other tips to pass along? I think keeping the frosting covered with a moist cloth or in an air-tight pastry bag also helped. I was even able to stick the leftovers in the fridge and finish decorating the rest of the cookies the next day...

But don't let that photo fool you! Most of the cookies didn't look like that :). I don't even want to talk about how much time I spent on those three cookies for that one photo; let's just say, I don't think Martha would've approved of the others. But who cares! The best part of this experience was getting to decorate them alongside my two pals, the hubby and Mirabel. Of course, when I handed Mirabel a small baby spoon loaded with lavender-colored frosting, and a cookie to decorate, she decided that the spoon of frosting belonged in her mouth instead of on the cookie. She ate the cookie second, then she proceeded to take one bite out of every other cookie I gave her to decorate. But when you're not quite two (or 28), that's how cookies are supposed to be enjoyed, right ;)?

Have fun baking and decorating these cookies with your loved ones this Easter weekend. And if you can't get around to making them until Christmas time, don't worry...who am I to judge? My initial plan was to make them around Christmas, but I was a little tired at that point in the pregnancy... And that's the obvious give-away, but below is the photo I promised, anyway :). Here are my TWO little girls. Juliette will be here this August (25th), just in time to start thinking about decorating Halloween cookies! Hopefully Mirabel will share the frosting with her!

...And if I owe you an email, you'll hear from me shortly :). Thanks!

Thursday, February 3, 2011

Gluten-free Croissants

Guess who?

Croissants!

little ones...

A letter from the croissants:
"We're finally here! Tasty right out of the oven, warm and buttery. 2 sticks of butter for just 14 of us, so you better believe we're buttery-delicious! You'll love the sweet aroma we give off while we're baking! We taste similar to those Pillsbury ones, except we're
homemade and gluten-free. (Shhh! Don't let our baker know that we told on her--she used to eat those a few years ago, before saying goodbye to gluten!)"

"We're cute and little, and still tasty next morning--no bed head, promise! We just need to warm up to the idea of being eaten the day after baking (that is, if we're still around), so stick us in the micro for 15 seconds and we'll be as good as new. Top us off with fresh strawberry or blueberry jam. We've heard that we're also pretty tasty with cranberry sauce (think Thanksgiving
or Christmas dinner, or even Valentine's Dinner!). Speaking of Valentine's, I bet we'd be delicious with a chocolatey filling!"

"Oh, and if there's a stranger living in your house who's on an anti-carb kick, you can make one extra little for them. See our wittle brother below? He's kinda camera shy--tried to disguise himself in rice flour while we were getting ready for the big photo shoot!"


Gluten-Free Croissants (makes 12-14 little ones)

Bowl 1:
1 cup white rice flour
1/2 cup brown rice flour
1 cup tapioca flour
1/2 cup sweet sorghum flour
1/4 cup potato starch
1 1/2 tsp xanthan gum
1 tsp sea salt
keep on the side:
2 sticks of cold butter
Bowl 2:
1 tbsp sugar
4 tsp yeast
1/4 cup warm water
Bowl 3:
2 large egg yolks (keep egg whites for egg wash)
1/2 cup evaporated milk
1/2 cup sugar
1/4 cup reserved white rice flour (just use it as you need it, don't use it all at once!)

Instructions:
Mix together ingredients from bowl one. Set aside.

In bowl 2, combine sugar and yeast, then add warm water; set aside and allow to proof (should become foamy on top), for about 10 minutes.

Keep on the side:
2 sticks of cold butter

Combine all ingredients in third bowl, set aside.

Now combine the ingredients from the third bowl into the large first bowl (with the flours!). Don't add yeast yet!

Cut up the cold butter into cubes (basically follow the lines on the butter wrapper, then cut them in half, after that so they're in half tablespoon amounts).

Wash your hands, then start adding the butter in, a little at a time. Work the dough with your hands until you've added all the butter. It's ok if there are lumps of butter still.

Now slowly pour in the yeast. Continue working the dough with your hands. Wash your hands. Now shape the dough into a ball, sprinkle the outside of the ball of dough with rice flour, but not all of the reserved rice flour (just so the surface is lightly coated).

Divide the dough in half. Work with half the dough at a time. Set the other half aside and cover with a clean cloth.

Roll the dough into a rectangle, then use a pizza cutter or knife to even out all the edges so it's a clean rectangle. Now you're going to cut out and shape croissants with a knife (like the tutorial) or a pizza cutter. Note: Don't pull the croissants, just roll them. Gluten-free dough isn't as elastic!

Follow this tutorial for how to cut croissants--but don't pull the dough like she does :): http://www.youtube.com/watch?v=221rAwr0CWk&feature=related

Let rise for 1 hour, covered with a clean cloth, and kept in a dark warm area. Use pastry brush to lightly brush on egg wash.

You'll end up with 14 croissants. Bake them in a preheated 350 degree oven for 14-16 minutes.


Sunday, January 23, 2011

Gluten-free Wonton Soup (or Ravioli :)

Are you all staying warm these days? That seems to be a struggle for us here on the East Coast, as we keep getting hit with one snowstorm after the other. Now I've got a sick little one and a craving for soup. But not just any soup...wonton soup!

Wontons: little magic bundles of porky deliciousness (except, these here are more Texas-sized). Who knew that getting pork filling to taste restaurant-good could be soo easy? But only thanks to a certain tasty recipe that provided the inspiration for this cooking adventure.

I've been craving wonton soup for months now, no--probably more like years (you GF folks know how it is to have an unsatisfied craving for ages!). I finally gave in and decided to experiment. Here are the results of my first experiment...

What I learned:
We're not going to have as much elasticity using gf flour to make wonton wrappers as we would using all purpose flour. Surprise! ;) But why should we let that stop us from experimenting?!

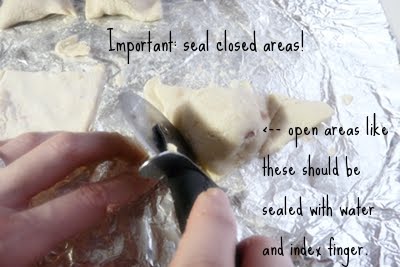
The good thing about this wonton dough recipe is that it's quite forgiving. I tried making the wonton wrappers (or squares) as thin as possible, and ended up with a few holes. Patching them up was fairly easy. Just use an extra bit of dough, if necessary. Keep a glass of water on the side to dip your index fingers in, so that you can use the water to "glue" the patch on. Smooth out the surface with more water. There were a few that didn't tear because I made 'em thick, but they ended up being thicker than I would've liked.

This dough is also pretty sturdy, because the wontons didn't fall apart after getting into some hot water (or chicken broth) with a few chopped green onions :). This particular recipe makes enough for 12 whole wontons, but the wonton filling (meatball) recipe makes enough for about 24.

When experimenting, I like to start off with small batches. You can just double the dough recipe if you like, or throw in a few meatballs without wrappers. They also won't dissolve in the soup :).

I think this recipe would make tasty homemade ravioli--give it a try and let me know how it works out for you!

I've also been experimenting with croissants! Yes, so far I've made them twice. Stay tuned for a croissant post in the very near future. (As in, not months from now. I promise to keep my resolution ;).

Finally...the recipe and a quick photo tutorial. Because of the elasticity issue, I decided to fold these more like ravioli than traditional wontons. :)

Wonton Wrappers, makes 12 complete:
2 tsp potato flour (not potato starch!)
1 tsp xanthan gum
1/4 cup brown rice flour
1/2 cup white rice flour
1/4 cup sweet sorghum flour
1 large egg
1/8 tsp sea salt
1/4 cup and reserved 2 tablespoons cold water

about 1/4 cup more white rice flour reserved, for rolling out wontons

Mixing instructions-create the flour blend first, then add the salt and xanthan gum. Mix well. Add the egg and water (2tbsp last). I divided the dough into smaller portions and covered the portions I wasn't using with a towel. You can either roll out with a rolling pin or use your hands (I found it easier to use my hands--like making tortillas). Then cut out individual squares (about 4 inches) with a pizza cutter; I filled each wonton with about 1.5-2 tsps of meat.

Wonton filling (ground pork):
1/2 pound ground lean pork
1 tsp mirin
1/2 tsp dried onion
1/2 tsp garlic
1 tablespoon soy sauce
1 tsp sugar
1/4 tsp ground ginger
Combine all ingredients, mix well.

Throw the wontons into a pot filled with 32 ounces of lightly boiling chicken broth. Add 1 tsp onion powder, and 1 tsp garlic powder. I also added 2 chopped green onions and a package of my favorite stir fry veggies (not traditional, but hearty :). I added the veggies at the very end, once the wontons were cooked (they should be firm, meatballs shouldn't be pink).


Tuesday, January 18, 2011

Cloudy with a Chance of...Molasses rolls?


Hi there , Folks!

I know, it's been ages! I'm a little nervous typing right now, because I feel like I actually have an audience! Believe me, this is definitely a good thing. I'm pleasantly surprised that you folks have subscribed. I'm not gonna list how many feedburner subscribers I have, because I'm sure some of you blogging pros will laugh at my excitement. Oddly, that's part of the reason why I don't blog as much these days, because I'm being watched :D!

I started this blog typing as if someone was reading, because isn't that how blogging works? At first, you tell yourself that the comments aren't there because imaginary blogging friends only have imaginary fingers, of course! Then, the adrenaline rush hits after the first couple of comments start rolling in; then you post a million times a day…and then?


Well, now you folks are saying things, and actually reading! Oh, the anxiety. I feel like you people are watching me now. I have a bit of stage fright, and I just use my 8 month old as my excuse for not posting ;). What if I forget to type in an ingredient when I input the recipe? What if the photos of my molasses rolls resemble meatballs instead of…molasses rolls. You all will kindly let me know, right? Right?!

In all honesty, I'm very thankful for you all! Thankful from the bottom of my carbohydrate-addicted heart! Thank you for giving me an excuse to bake gluten-free treats, especially now that my husband is on the paleo diet! Seriously, the guy is married to a woman with a blog called "Flour Arrangements" and he vowed to stop eating carbs in 2011! Meanwhile, my resolution is to post more on here! I guess opposites really do attract ;).

Enjoy these molasses rolls; I promise, despite the photos, they don't taste anything like meatballs! Actually, they don't taste much like molasses either, it's a very subtle molasses/spiced taste. Store them in an air-tight container, then warm 'em up in the micro for 15 seconds to enjoy them warm and soft after they've lost their "fresh outta the oven" texture.

Molasses Rolls (Makes 8)

Dry Mixture:
1/2 cup white rice flour
1/2 cup brown rice flour
1/4 cup almond meal
1/4 cup sweet sorghum flour
1/4 cup tapioca starch
1 tsp cinnamon
1/2 tsp nutmeg
1/2 tsp ginger
4 tablespoons low-fat dried milk powder
1 tsp xanthan gum
3/4 tsp sea salt
Yeast Mixture:
1 tablespoon sugar
2 1/4 tsp yeast
1/2 cup warm water (let rise until it just starts to foam on top--about 10 minutes)
Other wet mixture:
2 large eggs
2 tablespoons canola oil
1 1/2 tablespoons molasses

Combine all dry ingredients together, mix well.

In another small bowl, combine the water and sugar, then add yeast. Let it sit for about 8 minutes, or until foam just begins to form on top (proofing starts).

Next, combine the wet ingredients in another small bowl.

Fold the wet ingredients into the dry bowl. Then fold in the yeast mixture.

Let rise in a warm, dark area for about an hour.

Shape dough into individual rolls, about 8. Bake in a pre-greased cake or pie pan.

Preheat oven to 350 and bake rolls for about 22-25 minutes.

Store in air-tight container for up to 3 days (don't require refrigeration).

Tuesday, August 24, 2010

Gluten Free Chicken Fried Steak


It's a good thing recipes don't have expiration dates! This is a gluten-free chicken fried steak recipe that has been sitting on my desktop for months. It's a recipe that first caught my eye on A Feast for the Eyes; her recipe was inspired by The Pioneer Woman's. Now I'm giving you my gluten-free version!

My husband is also a huuuge chicken fried steak fan. He is very much a southern boy (well, now he is). But when I first met him, he seemed more like a city slicker--like myself. I'm a California native who still pretends she's going to see the ocean whenever she drives over any hill, especially when I'm hallucinating and dying of heat stroke in the middle of summer ;). He, on the other hand, just bought a pair of boots to wear to work this summer, has Texas paraphernalia sprinkled all over our Boston apartment, and still says ma'am (even when he's far from his homeland).

But he wasn't always like this, you see. The night I met my husband, he had an outfit on completely sponsored by Banana Republic, or so it seemed. He was also drenched in too much cologne. And I, being the outspoken girl that I was (the one he fell in love with ;) felt the need to tell him that he had on too much cologne. Ha! I was wearing an oversized college sweatshirt and Vans flip flops. I'm still the same girl, with more pairs of Vans than I know what to do with...but I have to say that Boston has changed my husband ;).

If you haven't been a reader for very long, I should probably let you know that my husband and I are only living in Boston because he's finishing up grad school here. 9 more months then we're heading back to the Lone Star State, where he's originally from. But my husband hates Boston. No, I mean he LOATHES it. And here's the funny thing that I've been hinting at: He didn't officially become a southern boy until he was transplanted to Boston! HAHA!

Now he will let everyone know that he's from Texas, and he'll say it with a huge smile on his face--and probably his boots and Stetson hat on, too (yes, he also has one of those now!). Some people say they're from LA, some folks say they're from New York, but ask any Texan where they're from and this is what they'll say: TEXAS. Not Austin, not Houston or San Antonio, but TEXAS. They're all very proud of their state :).

This post is dedicated to my favorite southern boy. I'm glad this chicken fried steak recipe reminds you of back home. I'll be sure to cook it up when it's the dead of winter and we're BOTH wearing our gorgeous long johns and crying about another dreaded Boston snowstorm! :D

Bowl 1:
3/4 cup white rice flour
1/2 cup tapioca
1/4 cup potato
1 tsp sea salt
black pepper, to taste
1/2 tsp baking soda
1/2 tsp baking powder

Bowl 2:
1 egg
1/2 cup buttermilk
1/4 tsp sea salt
1/4 tsp baking soda
1/2 tsp baking powder

Makes enough for 1 lb of chicken fried steak (USE CUBED STEAKS!)

Get out your aprons, this is a messy job :).

Instructions:
First mix up all the ingredients in Bowl 1. Set aside, then mix up all the ingredients in bowl 2.
Dip the steaks in bowl 2, then coat them in the flour (in bowl 1). Do this one more time, to get a nice thick coating of flour on your cubed steaks. Double dipping is ok in this case :D.

If you've got a cast iron skillet, now's the time to use it. I discovered it's not just a weapon ;), it's also great for making chicken fried steak!

You'll want to fill it up with plenty of vegetable or canola oil--like a few cups (I say about 3-4 inches worth of oil). Let the oil get nice and hot, sprinkle a drop of water in there to make sure it's hot enough; if it sizzles, it's ready...then throw your steaks in, cook on one side then use tongs to turn them and cook on the other side. I cook them covered so that they cook on the inside. Cook until they're golden brown and crispy on the outside. Set on paper towels when they're cooked. Enjoy!

Thursday, March 25, 2010

Gluten-Free Spiced Date Biscotti with Maple Glaze


Despite the fact that their strange appearance reminds me of the creepy crawly creatures that nest in dark places, and crawl across our floors or walls at the most unexpected times, dates are pretty delicious. Fruity, sticky, chewy, and naturally sweet, dates are pretty much nature's healthy candy.

But, of course, not all of us are date fans.

Some of us prefer chocolate in our desserts, some of us choose cranberries or raisins over other dried fruits, while others just like to keep it simple and nutty. How do you like your biscotti?


I think we can all agree that biscotti is most tasty when its got a good crunch. If it crumbles upon meeting the hot chocolate or dark coffee in our mugs, forget about it! That biscotti is a no-go. I'm more of a tea drinker, but even I hate scraping up the get-away crumbs clinging to the bottom of an otherwise empty cup.

So, to avoid that dilemma, let's choose a biscotti recipe that won't fail us! The one in the recipe card below is reliable, promise. It's based on someone else's scrumptious version, minus the butter and plus a few other ingredients (like the creepy looking dates :).

This gluten-free biscotti recipe will definitely yield dip-worthy treats that won't crumble under pressure! If you don't believe me, give it a whirl!

**Oops! Almost forgot :). Amy over at I am Celiac was sweet enough to feature me on her blog earlier this week! Go check out her blog and say hello!

Spiced Date Biscotti with Maple Glaze

gluten-free

You can easily adapt this recipe; swap the dates ...

See Spiced Date Biscotti with Maple Glaze on Key Ingredient.

Wednesday, February 10, 2010

Gluten-Free Linzer Cookies (Tutorial and Recipe)


I know I promised to post the artisan bread recipe, but I woke up extra early to make linzer cookies this morn' and, by golly, I've just been so excited about them that the mess (that resulted from the baking, mixing, etcing) really didn't take the joy away from the whole experience! See, I'm speaking in run-ons. I. am. excited!

So what's so exciting about waking up at the crack o' dawn to make a batch of gluten-free linzer cookies? The dream becoming a reality, people! What dream? I've been wanting to make linzer cookies forever. Even before going gluten-free. But I just thought they were too pretty for my butterfingers. I thought I'd mess them up and disappoint Martha or Ina, whose shadows haunt me like Marley's ghost when I FAIL. (Except theirs are wearing some kind of perfectly pressed buttoned up pastel shirt with a semi-popped collar.)


But even they might give me at least a teeny-tiny grin for today's attempt. The hours of waiting, stirring, blending (that would be for the filling), jam-smothering, powder-sugar-sprinkling, and baking all paid off! Sure, some are a little ugly (I grounded them from receiving close-up camera time), but they're good. Yep, the husband approves.

One thing I should note, the filling is homemade but not truly jam-like. I made it more gluey because I didn't want to deal with a wet mess. The end result? Sandwich cookies that stuck! Yeah! No water was added to the filling, just strawberries, sugar, a little packet of knox, and a tablespoon of corn starch. Read on for the tutorial, if you wish :).


So that's how you should flatten out the dough before sticking it in the freezer, and how you should sprinkle it with white rice flour before rolling it out. (I like to use aluminum foil when rolling the dough/cutting the cookies, so I can just put the cookies right on the baking sheet without having to move them.) The red stuff is the strawberry filling, before it chilled, it's thick.


Roll out the dough nice and flat, it's a bit thick in the picture. Roll it out to slightly more than 1/4 of an inch. The dough should be easy to work with, making the cookie-cutting experience a fairly painless one :).


Be sure to use "nesting cookie cutters", as pictured on the far left. And... the next picture? What the cookies should look like when you've baked, jammed, and sprinkled them.


Gluten-Free Linzer Cookies (with strawberry filling)

…can also be used as a sugar cookie recipe, minus ...

See Gluten-Free Linzer Cookies (with strawberry filli

ng) on Key Ingredient.


Monday, February 8, 2010

Gluten-Free Angel Food Cake (cupcakes)


Sometimes the simplest things will hit the spot. Don't get me wrong, the world would surely be a sad place without rich desserts or salty snacks... but sometimes (just sometimes ;) all I want is a bite of a simple and classic sweet treat. Angel food cake will usually hit the spot during these times, but who wants to wait an hour before enjoying a slice? That's why cupcakes were invented... (well, probably not, but it makes sense!)

I can't even remember the last time I had a piece of angel food cake before going gluten-free. It seems there are plenty of cookie options out there, even cake mixes, but I've yet to find one for gluten-free angel food cake (if you've found one that you love, let me know! :).

Sure, angel food cake usually doesn't come with frosting, but that's the beauty of making things at home... you can make them however you want! So feel free to experiment with these little angel food cake cupcakes. Frost them or enjoy them commando; cupcakes with out the frosting = commando cupcakes :D.

I like to use this frosting recipe, it reminds me of cream cheese frosting, minus the cream cheese ;).

Chocolate fans will like this frosting recipe.

Stay tuned... I whipped up some gluten-free artisan bread over the weekend and it's might tasty! I'll share the recipe next time.

Gluten-Free Angel Food Cupcakes

You can eat more than one of these at a ...

See Gluten-Free Angel Food Cupcakes on Key Ingredient.

Tuesday, January 26, 2010

Soft and Chunky Gluten-Free Pretzels


It's been so long
, I tell myself... so then I wait a little longer to post...

oh, sooo behind on my blog reading--not such a good blogging buddy after all
... another reason why I hesitate to post.

But heck, life is too short and eventually I'm gonna run outta time and excuses! So I might as well post today. Want to know what one of my favorite quotes is? Don't put off for tomorrow what can be done today, ironic (well, it goes something like that... :).

I hope you all have been well. I'm mostly crafting these days, but when a craving kicks in... like a craving for pretzels, I find myself covered in flour, in the kitchen once again, like old times. Ah, feels so good.

So here's a recipe for soft pretzels. Soft because that's how I like 'em. The crunchy salty ones make me thirsty! I'm a carb lover because I enjoy sinking my teeth into the doughy yumminess of baked goods -- so, of course, I'm going to make a soft pretzel.

And it's not just soft, it's also gluten-free. And I know what you're thinking... it looks gluten-free :/. It does have that awkward wanna-be pretzel look, you're right... but trust me, the minute you sink your teeth into these gluten free pretzels, right after you've brushed them with butter and sprinkled them with you favorite kind of salt (and there are so many different kinds of salt), you'll find that nothing is missing (except for the gluten, but that's a good thing here :).

The flavor is there, even the aroma... oooh yeah, you know what I mean -- the tasty aroma that hits your nose when warm pretzels are near. And the texture? Like I said, these are soft, soft and chunky. These gluten-free pretzels are the most scrumptious right outta the oven, but you can also enjoy them the next day warm by popping them in your little toaster oven or the micro, just for about 15 seconds (be sure to store in an air-tight container). Yum. Enjoy!

P.S. Ever wonder why the pretzel-pros dip they're pretzel dough into a solution of either lye and water or baking soda and water? Because it helps give the pretzels they're pretty brown color! I didn't know that... but these pretzels aren't meant to be dipped. Instead, gently brush them with the baking soda/water solution (as mentioned in the recipe card below). Happy baking! :)

Stay tuned for next time, when I'll post my gluten-free angel food cupcakes recipe!

Soft and Chunky Gluten Free Pretzels

This recipe came about after studying… this recipe:

http://allrecipes ...

See Soft and Chunky Gluten Free Pretzels on Key Ingredient.

Friday, December 25, 2009

Gluten-Free Gingerbread Pancakes


HI All!

It's been awhile, and I hope I'm not catching you after breakfast because you haven't had these gluten-free gingerbread pancakes yet :)! I hope you're enjoying your Christmas morning so far. It's been a fun and interesting morning for me, as a joke I found dental floss in my stocking! I'm always telling hubby to floss, so I think Santa decided to play a joke on me and stuff my stocking with high quality dental floss ;). I guess after stuffing my face with these maple syrup lathered pancakes, I'm going to need to make sure I floss well :D.

Anyhow, there just aren't enough gingerbread pancake recipes out there. Feel free to add a bit (maybe 1/2 tsp more) ginger to this recipe if you really like spicy gingerbread pancakes. Have a delicious and Merry Christmas. Hopefully I'll be back again sooner than later :).

Gluten-Free Gingerbread Pancakes
*please note I fixed the typo that said 3 TBSP xanthan gum, only 1/2 tsp required :)
Makes 7 6 inch pancakes

3/4 cup white rice flour
3/4 cup brown rice flour
1/2 cup tapioca flour
1/4 cup potato starch
1/2 tsp xanthan gum
1 teaspoon baking powder
1 tsp baking soda
1 teaspoon cloves
2 teaspoons cinnamon
1/2 teaspoon nutmeg
1/4 teaspoon all spice
2 3/4 teaspoons ginger
2 eggs
1 tsp sea salt
4 Tablespoons brown sugar
3 1/2 TBSP canola oil
2 Tablespoons dark molasses
1 1/4 cup evaporated milk (lowfat)
1/3 cup lowfat milk (add after combining all other ingredients together!)

So as you can see, this is a lengthy recipe and you'll probably want to open your Christmas presents before attempting to actually make 'em ;). Good news is, all you need: 2 bowls! 1 for the dry ingredients and 1 for the wet. Just combine all the dry ingredients in one big bowl and mix very well. Add all the wet EXCEPT for the regular milk, you'll mix that in last after you've combined the ingredients from the wet/dry bowls. Also, make sure that your pan is nice and warm before cooking the first pancake--let the pan heat for about 3 mintues on medium/low before making the first one so that it doesn't have that funny "first pancake of the batch" look :0).

Merry Christmas!

Monday, October 26, 2009

Gluten-Free Barbecue Sauce!


Diet restriction. I don't like how that sounds. Why does it have to be a restriction, why can't we just focus on the word free when we say gluten-free? Probably because we don't have many options.

But that can mean freedom, folks. Freedom from the box, whether it's the cake mix box or the box of glutinous cookies you can no longer devour (time to make our own tasty versions!). For me, it's more about thinking outside of the bottle...

I've made a new kind of food pyramid for myself. I'm not ashamed. The very bottom, recognized as the largest section, is strictly reserved for comfort foods (but at this point in my expecting life, they are necessities). That's where you'll find an assortment of yummy foods, from homemade yellow cake with chocolate frosting to... barbecue! Barbecue is on my food pyramid, yep. Though it might not do anything for my heart, its presence on my plate certainly makes the smile on my face a little bigger! :)


Ah, but gone are my KC Masterpiece barbecue sauce days. No more reaching for the bottle and pouring that great maroon colored sauce on chicken or ribs. The only gluten-free barbecue sauce I know about is Annie's... and I'm not a fan :( (though she does make tasty mac and cheese).

I remember the first time I made barbecue sauce from scratch. It was tasty... but it was missing the special somethin' somethin' that makes barbecue over-the-top finger lickin' good. Ok, so I'm referring to the cheater's version of barbecue (aka heavenly smokiness in a bottle). But it's just too cold outside for a real barbecue (and, unfortunately, it isn't allowed at my place!).

So what to do? Make a sweet and smokey sauce for my slow-cooked ribs. Yum!

Meat falls off the bone, just the right amount of sauciness... borderline illegal, folks. This gluten-free bbq sauce has THAT mouthwatering zing; it'll make taste buds happy and bellies sing. Thankfully, I can use my favorite worcestershire sauce now because it's finally gluten-free (thank you Lea and Perrins :)! Woohoo! Just make sure the vinegar is also gluten-free and you're good to go!


Oh yeah... and make sure you've got plenty of napkins! ;)

Gluten-Free Barbecue Sauce and Ribs

The secret ingredient? Sweet apple cider! :)

See Gluten-Free Barbecue Sauce and Ribs on Key Ingredient.


Friday, September 4, 2009

Vegan and Gluten-Free Cheap Eats


If you need a yummy recipe for something sweet or savory, Mare's blog, Meet Me in the Kitchen, is the place to go. Blogs like Mare's make you wish there was an instant 'feed me!' option located under 'file' right beneath 'print'. You know what I mean. I think foodie heaven is something like that.

Anyway, I knew I had to make these Chickpea Fritters when I spotted them on her blog. YUM! The fritters are so appealing because they're made from affordable and healthy ingredients. A can of chickpeas for just $0.89 and a pinch of some spices that are already in your pantry, and you've got a delicious vegan snack or light meal!

Now, I happen to be like many of you food bloggers out there; I'm always 'tweaking around in the kitchen. I don't even remember the last time I actually followed a recipe to the letter. So I present my modified version... oh yeah, and it's gluten-free too :).

Original recipe here

For the chickpea fritters:
1 15 ounce can chickpeas, strained
pinch of saffron threads (like 1/8 tsp)
1/4 tsp cinnamon
3/4 tsp sea salt
1/2 tsp chili powder
pinch of all-spice
tablespoon chopped fresh cilantro
pinch of cumin
1 small garlic clove, finely chopped & sauteed in olive oil

GF flour blend that coats the fritters:
1 TBSP white rice flour
1 TBSP corn meal
1/8 tsp garlic salt
1/4 tsp basil
1/8 tsp paprika

For the yogurt sauce:
about 4 tablespoons greek yogurt
3/4 tsp honey
pinch of salt
about 2 tsp finely chopped fresh cilantro

Start off by sauteing the garlic in a little bit of olive oil (and strain those chickpeas!).
Once it's slightly golden, you'll throw it in the food processor with the ingredients from the first list.
Next, you'll combine all the ingredients for the flour mix in a small bowl.
Start forming the chickpeas into flat patties, mine were a bit thick, and cover them with flour on each side.
Lightly fry them in some olive oil until they're crispy on both sides.
For the yogurt sauce, just mix everything together in a bowl.
See how fast that was!

Now onto our second recipe of the day... QUINOA! I just love saying that, it's such a fun word. Sounds like it should be the name of my future pet (my last guinea pig's name was Mochi, I like naming my pets after food these days). Quinoa is a super-food, pretty much, a grain that deserves more attention. But I must warn you, first-time quinoa eaters, the secret to make a delicious quinoa dish is this: rinse, rinse and rinse again (because you want to get rid of those bitter saponins)!


If there's one food you certainly should not judge by its appearance, it's quinoa. Poor not-so-pretty quinoa. Let me tell you, beneath the little celery leaf, the crushed almonds and finely grated carrots, you'll find a funky-colored but very scrumptious grain that's packed full of protein and other good stuff.

Sweet Potato Veggie Quinoa
1 cup quinoa
2 cups water
1/2 tsp rosemary
1 tsp savory
3/4 tsp salt
1/2 tsp cinnamon
1 garlic clove, finely chopped
2 tbsp olive oil
1 parsnip, peeled and sliced into 3/4 in. long by 1/4 inch wide pieces
(more salt and rosemary for parsnips, and 1 TBSP honey)
about 3/4 cup frozen peas and carrots
1/2 cup baked and mashed sweet potato pureed with 1/4 cup apple juice

Start by arranging the cut parsnips on a cookie sheet.
Lightly drizzle them with olive oil, sprinkle with salt, and finish them off with a light drizzle of honey and a few shakes of rosemary.
Raise oven temp to about 400 and bake until they start to brown (20 minutes in an oven that's not preheated). You can put them in before the oven is preheated, just make sure they bake til they're just a little brown on the corners.

For the quinoa:
Rinse the quinoa very well.
Next, add the olive oil to a medium stainless steel pot with the garlic, begin to lightly saute then add the quinoa and continue sauteing and stirring for about 2-3 minutes; add the rosemary and savory.
Now add the water and salt, cover and cook until only about 1/2 cup water is left.
Puree baked sweet potato with apple juice until smooth.
When 1/2 cup of the water is left, add the pureed sweet potato and apple juice.
Continue stirring while cooking quinoa on high with lid removed until all the liquid evaporates.
When the quinoa is no longer watery, mix frozen peas and carrots and the baked parsnips and cook on low for 5 more minutes, until veggies are thawed.

Have an awesome Labor Day Weekend. Need a smile? Click here to check out a cute picture from one of my favorite blogs!

Saturday, August 29, 2009

Gluten Free Creamy Tomatillo and Garbanzo Bean Pasta


I have a suggestion to make. If you haven't seen Julie and Julia, go see it... but make sure to pack something tasty to snack on, especially if you're gonna watch it around lunch time! I just snuck in a little cornbread square, but that was not enough to hold me over. Seeing all that delicious food on the big screen made my tummy rumble even more. It was too much, kinda like grocery shopping on an empty stomach! Very cute flick, though. On a random note, I just found out her old home, that once housed the kitchen in the movie, is 800 feet from my apartment! How cool is that!

After watching the movie, we ran home from the theatre in the rain and scarfed down our lunches. I felt an anxious tingle in my fingers the entire time I was eating, though. Not just because they were pruney from the rainwater; I was itching to cook!

I have to confess, every time I see someone cooking, whether it's on the Food Network, Julie & Julia, or in real life... I just wanna jump right in and join 'em!

Do you get that tingle in your fingers too? :)

Ahh... feels so good to cook, especially on a rainy day. Here's a warm, comforting meal. It's affordable and flavorful; healthy but not quite vegetarian. I tried, really. But oh! Leave it to the chicken broth and worcestershire sauce to spoil everything ;).

Make sure the worcestershire sauce is gluten-free!

... on a sidenote, we're cooking up somethin' special this weekend. Or I should say we've been cooking up. Can you guess what it is? One of my favvvvorite meals :). Nope, not roast beef!


Creamy Tomatillo and Garbanzo Bean Pasta

Not quite vegetarian, but pretty close! Very tasty too, says ...

See Creamy Tomatillo and Garbanzo Bean Pasta on Key Ingredient.


Thursday, August 27, 2009

Gluten-Free Crackers and Gluten-Free Challah Sandwich Bread

Image Hosted by ImageShack.us


If there's one thing I've recently regretted buying at the grocery store, it's gluten-free crackers. I can't tell you how many times I've been disappointed by pre-made gluten-free products, especially the overpriced crackers that taste like cardboard :'(. Yes, it even deserves a little tear.

Guess what, though? We don't have to settle for this any more. It's time for us to make our own crackers! (Who knows how long it'll take the little elves from Keebler to whip up a batch of tasty gluten-free crackers?! Betty Crocker's already done it with cookies, she gets brownie points for that! :)

Even if you're new to gluten-free baking, you can make these crackers in a snap. Adapt the recipe to your liking, maybe even add a little cheese, like Carol Fenster suggests. This cracker recipe is based on Carol Fenster's (I changed the flour mix, didn't add corn syrup and made them with some canola oil instead of using all butter. I also didn't add sesame seeds... looking back, it's pretty different, I guess :P.)

One thing I might change next time? I've gotta admit, I think I might add a bit more garlic salt and Italian seasoning. But they're still tasty and buttery flavored; they kinda me of those Club Crackers by Keebler, except they're a little thicker (I didn't roll them out thin enough :P).

What else is on today's menu? More carbs! OH, HOW I'VE MISSED YOU, CHALLAH BREAD!


Now we can have our gluten-free challah bread and sandwich too... here's a gluten-free challah sandwich bread recipe. It's got a bit of a twist with the added orange zest and brown sugar. Though I like that it came out moist and gluteny in texture, I especially like that it only has one edge of crust! :P. (Shhh... sometimes I still cut off the crust, but now I don't have to. ;)

One thing I've learned about making gluten-free sandwich bread dough is that you want it to be a little more moist than traditional gluteny bread dough. Gluten-free sandwich bread tends to be dry; the many eggs in this recipe make it moist but still firm enough to slice (and the eggs also make it challah-tasting :). Give it a try... and guess what? This is easy to make, too! Throw everything together in about 15 minutes, let it rise for an hour and bake for about half an hour... that's it! :)

Gluten-Free Challah Sandwich Bread
(Large) Bowl 1:
1 cup white rice flour
1 cup tapioca flour
1/2 cup brown rice flour
1/4 cup potato starch
1 3/4 tsp xanthan gum
1 tsp sea salt
3 Tbsp white sugar
2 Tbsp brown sugar
1/2 tsp orange zest
3 whole eggs
3 Tbsp canola oil

(Small) Bowl 2:
1 cup warm milk (microwave for 30 seconds)
2 1/4 tsp yeast
2 tbsp sugar

Fill an oven safe baking dish (like a 9 inch cake pan) with warm water and place it on the last rack in the oven. Now turn the oven on to the warm setting, or to 200 degrees.

Add the sugar to small bowl 2, then add the yeast and the warm milk. Set aside for about 5 minutes or so, while you work on bowl 1.

Combine all the ingredients in bowl 1 (EXCEPT EGGS AND CANOLA OIL). Before adding eggs and canola oil, make sure that it's mixed together well so that everything from the xanthan gum to the salt are evenly distributed throughout the flour mixture.

Make a little well in the middle of the flour mix in bowl 1, this is where you'll add the canola oil and eggs. Start mixing in the eggs and canola oil, working from the inside out. Then slowly pour in the yeast mix while continuing to stir with a fork. Make sure it isn't lumpy but don't over mix.

Now turn off the oven. Spray a medium-sized bread pan with non-stick and pour the bread dough (it will look like bready/cake dough) into the pan, make sure to smooth out the top so that the dough is evenly spread out on top. I use the back of a spoon or small fork. Next, place the bread pan with the dough in the oven, on the middle rack, above the pan with the warm water. Let it rise for an hour.

After the hour, leave the bread in the oven and turn on the oven to 350, bake the bread for about 10 minutes. After the 10 minutes, quickly and gently cover the top with foil (make sure it's loose) so that it doesn't over-brown. Cook for about 25 more minutes. (Bake time is about 35 minutes total.)

Cracker recipe is in the recipe card below:

Gluten-Free Crackers

Based on Carol Fenster's cracker recipe from her book ...

See Gluten-Free Crackers on Key Ingredient.

Saturday, August 22, 2009

Big Gluten-Free Buttermilk Biscuits


It's taken me forever to come up with a fluffy gluten-free biscuit recipe. Sure, I made a few tasty ones in the past, but they didn't quite puff up the way I wanted 'em to. Thanks to the Barefoot Contessa (I learned this on her show :P), I discovered what I was doing wrong: melting the butter instead of adding it to the dough as cold chopped chunks. Cold chopped chunks doesn't exactly sound appetizing, huh? But I promise these are quite tasty. In fact, I was surprised to discover that you don't actually need a whole stick of butter to make a tasty and fluffy buttery (flavored) biscuit. You can even get away with using only 2 tablespoons of butter and a bit of canola oil. I've tweaked this recipe quite a bit, making a buttery version and a leaner version that calls for canola oil; both versions are included in the recipe card below.

These biscuits are big, just how big?
My hand isn't huge, but I do have some mighty long fingers, thanks to my mom. These biscuits are hefty, so hefty, I can usually get away with eating just half of one. These biscuits are great to have around for breakfast; forget fast food sausage and egg biscuits... you can make 'em yourself now! (Don't worry, I'll post a sausage recipe soon :).

So how exactly should the butter look when it's thrown in the dough? Just take a look at them chunks!:

How do you assemble the biscuits? Well, xanthan gum tends to make things sticky, so I have a little trick I like to use when working with gluten-free dough. Contrary to what I've read, I actually like to wet my hands/fingertips with a little water so that the dough doesn't stick to 'em when I'm shaping the dough; you could also use melted... butter or a little oil! I shape the biscuits into disks, like this (make sure they're adequately spaced apart, because they expand a lot).:
So other than making biscuits (well, I actually made these nearly 3 months ago, believe it or not!), I've been pretty busy! Hope you all are enjoying the summer!

I won't stay away too long, I've got a recipe for gluten-free crackers that I've gotta share, after all :)!

Big Gluten Free Buttermilk Biscuits

Big and buttery, easy to adapt!

See Big Gluten Free Buttermilk Biscuits on Key Ingredient.


Thursday, July 30, 2009

Gluten-Free Black Forest Bacon Wrapped Steaks with Honey Dried Fruit Glaze


...because everything is better with bacon,
especially juicy top sirloin steaks. The end :).


Black Forest Bacon Wrapped Steaks with Honey Dried Fruit Glaze

Good and surprisingly easy to make!

See Black Forest Bacon Wrapped Steaks with Honey Dried Fruit Glaze on Key Ingredient.

Wednesday, July 15, 2009

Gluten Free Pizza!!!!!! Yes, it's edible :).


Are you a thin or thick crust pizza fan?

I like both, but it really depends on my mood :P. I do have to say that I usually go for a medium crust. You know what else? Even though I find myself craving pizza quite a bit, I've never wanted to try that crust-free pizza we're seeing commercials for again; it's naked to me, missing something very essential. I love the crust, it's the best kind of bread... and I looove bread :). But the crust does have to taste good, not dry or bland, and especially not yeasty! Yuck.

I was not very impressed with this gluten-free pizza crust recipe that I tried awhile ago, it was too yeasty and tough. But this here gluten-free pizza recipe (recipe @ the end of the post) will yield a yummy, non-yeasty medium sized pizza with a medium/thick crust. No more crumbly, funky tasting gluten-free pizza dough! :)

Guess what else is cool about this recipe?!

You can make it with baking powder and baking soda if you don't want to wait for the yeast to work its magic!

I know there are days when I'm on the verge of passing out but still really want a slice of pizza! You know what I'm talking about! And let's face it... there isn't a gluten-free pizza delivery service! So what do we do? Use 1 tsp baking powder and 1 tsp baking soda instead of yeast. And I'm not just saying that, I promise! I've made foccacia bread following this same recipe, I just replaced the yeast with baking powder/soda :). The leavener combo worked and I didn't pass out from hunger; everything was ready in under half an hour! Yes, Martha, that is a very good thing indeed.


Just a sidenote: I always feel a little weird saying something like, "Oh yeah! I made this and it's gooood". I'm not a professional chef, I'm just a cook who is still learning. I screw up all the time and my kitchen looks like a disaster zone when I'm baking, seriously (I'll post pics soon!).

I just wanted to mention this because I think it's nice to be candid. That said, I did enjoy the pizza. I'm happy with it, but I'm not obsessed with my 'skillz' (which are honestly lacking) or my cooking/baking, K? In fact, usually I like eating what other people make (like mom/grandma/hubby... when he cooks ;) more than I like munching on my own food :P. I've never felt judged by anyone, nor have I ever received mean comments... But I have wanted to say this on Flour Arrangements for awhile now, and I thought it'd be fun to randomly squeeze it into today's post :).


This gluten-free pizza recipe is my entry to the What Can I Eat That's Gluten Free blog carnival hosted by Linda at The Gluten-Free Homemaker :)! There just aren't enough gluten-free blogging events out there, if you all know of any others, let me know!

Gluten Free Pizza!

Yes, it's actually edible! Disappointed with the last recipe ...

See Gluten Free Pizza! on Key Ingredient.


Saturday, July 4, 2009

Gluten Free Orange Apricot Yellow Cake with Orange Cream Frosting


What are you doing reading this blog post?! It's the 4th of July! Go out and celebrate, make this cake. Oh wait, I guess you wouldn't have found this really moist, sweet and addicting cake recipe if you hadn't checked out today's post ;). Have a good one!


Gluten Free Orange Apricot Yellow Cake with Orange Cream Frosting

Decorated r/w/b for the 4th of July =o ...

See Gluten Free Orange Apricot Yellow Cake with Orange Cream Frosting on Key Ingredient.

Thursday, June 25, 2009

Go Ahead, Honey, it's Gluten Free Event! Grow Hair on Your Chest Pork and Beans, Salsa & Chips

This is the longest post everrrrr! :)

So maybe the title's a bit much, but it got your attention! I certainly hope I don't grow hair on my chest as a result of eating this :P! These Pork and Beans with a side of Salsa and Chips are my submissions to June's Go Ahead, Honey, It's Gluten Free event hosted by Carol over at Simply Gluten Free. The theme is manly food!

I have to give you a little head's up about the pork and beans, it's a leftovers concoction! The pork I used was from a ham roast I cooked a few days ago. We still had quite a bit left over and I hate wasting, so I used up the rest to make the p and b.

I made baked beans when we had family over for dinner recently. No, they are not Bush's, but they are plain canned pinto beans; they are really good to have around when it's too hot to have the stove on all day. I didn't exactly measure the ingredients that went into making the beans, but it's really hard to go wrong with them so long as you add the basics (to follow) and taste as you go. I'd say the most important thing is to remember to let them simmer on low for awhile. These beans, though canned & pre-cooked, simmered for about 1 1/2 hours total. The good thing is that they were a little underdone right outta the can, so they didn't over cook while simmering.


Monica over at Lick the Bowl Good has an amazing pork tenderloin recipe that I tried awhile ago and LOVED. It is really incredible. I didn't know what to do with this big ol' ham that I bought at the farmer's market this weekend (it was a 3lb ham, but I only used 1/2 of it, and then only used about 1 pound for the actual pork and beans). Then I remembered Monica's tenderloin glaze and I also came across a pretty good one from Emeril (you can see it here). I used a few ingredients from each recipe to come up with a marinade for the pork.

This is the Citrus Pork Marinade I used (this marinade is good for 1 1/2 pounds of pork/ham)
1/2 can of frozen orange juice concentrate
1 1/2 pound ham
1 8 ounce can pureed pineapple
1 8 ounce can sliced pineapple, blended
1 teaspoon cinnamon
1/2 cup brown sugar
1 1/2 teaspoons salt
1/4 teaspoon cloves

I let the pork marinate for a day, then I cooked it in the oven with the juice at 350 for about 2 hours. I also let it rest for a day in the fridge, fully cooked and still in the juice, before making the p and b. I eventually just used about 1 pound of this marinated ham for the pork and beans.


Now for the Baked Beans, this is the general recipe:
2 16 ounce cans plain pinto beans, no seasoning :)
about 1 cup of canned roasted tomatoes
a few tablespoons olive oil
1/2 tablespoon butter
1 red bell pepper, chopped
1/3 of a large sweet onion, finely chopped
about 3 Tbsp salsa (recipe to follow)
about 2-3 TBSP finely chopped fresh cilantro
about 1/4-1/3 cup brown sugar (more if you want it sweeter)
a few tablespoons real maple syrup, to taste (about 2-3)
a few tablespoons liquid smoke (about 3-4)
a few tablespoons gluten-free (Amy's) ketchup (about 3-4)
a few shakes of garlic salt and onion powder
small pinch of cloves
pinch of white pepper
black pepper, to taste
more salt to taste

Saute the onion and bell pepper in the little bit of butter. Then you can add the beans and the rest of the seasoning, stir. Next you can add the olive oil and tomatoes, then add the rest of the wet ingredients, brown sugar and the maple syrup. Let it simmer for about 45 minutes. Lastly, add the fresh chopped cilantro and let everything simmer for 20-30 more minutes on low-low :). This will make more than you need for the pork and beans.

Now for the Pork and Beans
Cut up 3 cups of the cooked pork, add it to a small pot with 1 cup of the leftover marinade. Cook on medium and reduce the marinade so that it becomes kind of like a thick gravy/sticky glaze. After that, you can add 2 cups of the cooked "baked" beans, you can add more bell pepper, onion and tomatoes if you like veggies, now you want to let it simmer on low for about 45 more minutes. You might want to add a bit more salt and pepper to liven up the flavors, taste first, though.

The Salsa (this makes 1 cup of mild/medium heat salsa):
3/4 of a cup roasted tomatoes in a can
1/3 large jalapeno (in vinegar, in a jar)
1/2-3/4 tsp jalapeno vinegar, from the jar
1/3 cup caramelized onion, chopped
1/2 red bell pepper, chopped
1 small garlic clove, very finely chopped
about 1-2 tbsp fresh chopped cilantro
1/2 tsp sea salt
1/3 cup chopped green bell pepper
1/4 cup more chopped onion
1/4-1/3 cup chopped cherry tomatoes

To make the salsa, first caramelize the onion, add the chopped bell pepper and finely chopped garlic. Now add the roasted tomatoes, salt, jalapeno vinegar and jalapeno. You'll throw this all into the food processor, pulse, leave it a little thick/chunky. Now you can add the rest of the chopped, raw veggies. Let it simmer for about 15 minutes, you can add more jalapeno and/or vinegar to spice it up; don't add the seeds if you don't want it spicy, though :). Put it in the fridge and serve chilled :).


I bet you're hungry after reading such a lengthy post, let's eat!

Sunday, June 21, 2009

Gluten Free Paula Deen Rocky Road Bars

Happy Father's Day!

So if you haven't seen these amazing brownie bars over at Taste and Tell, head on over now! If you're not on a gluten free diet, you'll want to follow her recipe to the T; it's a good one!

I really really wanted to make these for Father's Day/my husband's birthday, so this past week I made a gluten free version. I mailed some over to my parent's house and they were a hit. We also had a couple left over last night and even though they were 5 days old, my mother in law & sister in law gobbled them up too =o).


I've yet to find gluten free graham crackers, so I had to improvise there. I combined gluten free Mi-Del Cinnamon Snaps and crushed Gluten-Free Rice Chex to make a modified version of the graham cracker crust. The other change I made is that I used white chocolate chips instead of toffee; I didn't have toffee :P. Because the brownie part of the recipe is different, I noticed that I had to cook my brownies a bit longer, so the cookie crust came out a little crispier than expected, but still tasty.

Step 1: Step 2:

The brownies/bars are super moist. If you make these Gluten Free Paula Deen Rocky Road Bars, then you'll want to closely monitor the brownies when you're baking them (I kept checking them every 10 minutes or so). Also, don't expect the knife/toothpick to come out clean when you're checking for doneness because they're going to be like fudge in texture :P! It's best to let them cool for about an hour before diving in, they'll stay together much better that way. :)

OOPS! ALMOST FORGOT TO POST THE RECIPE :P

Gluten Free Paula Deen Rocky Road Bars

the gluten free version of Paula Deen's Rocky Road ...

See Gluten Free Paula Deen Rocky Road Bars on Key Ingredient.